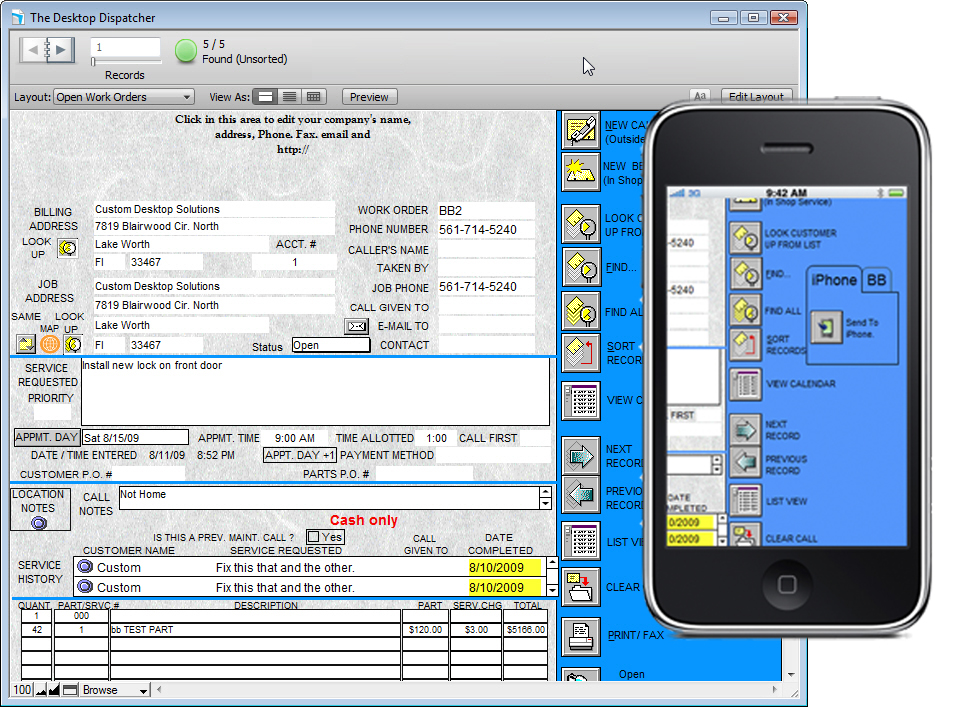
Get even more out of the iDispatcher by syncing it with The Desktop Dispatcher available at The Desktop Dispatcher

The Desktop Dispatcher is the PC or Mac based, big brother of iDispatcher.
With The Desktop Dispatcher, you can
The plugin that allows you to sync with The Desktop Dispatcher is included with the program. Syncing over the 3G networks requires the user to allow port forwarding through your firewall, modem and or router. Unfortunately, because there are so many kinds or router, modems and firewalls out there, we can only offer limited support for this option, other than providing a rough outline. Firewalls should have the following system service ports open. Bonjour port number 5353 and FMTouch port number 8887. Bonjour comes with iTunes and is already installed on your computer. You only need to set this up to auto detect your wireless network without it, you will need to use the manual connection method listed below.
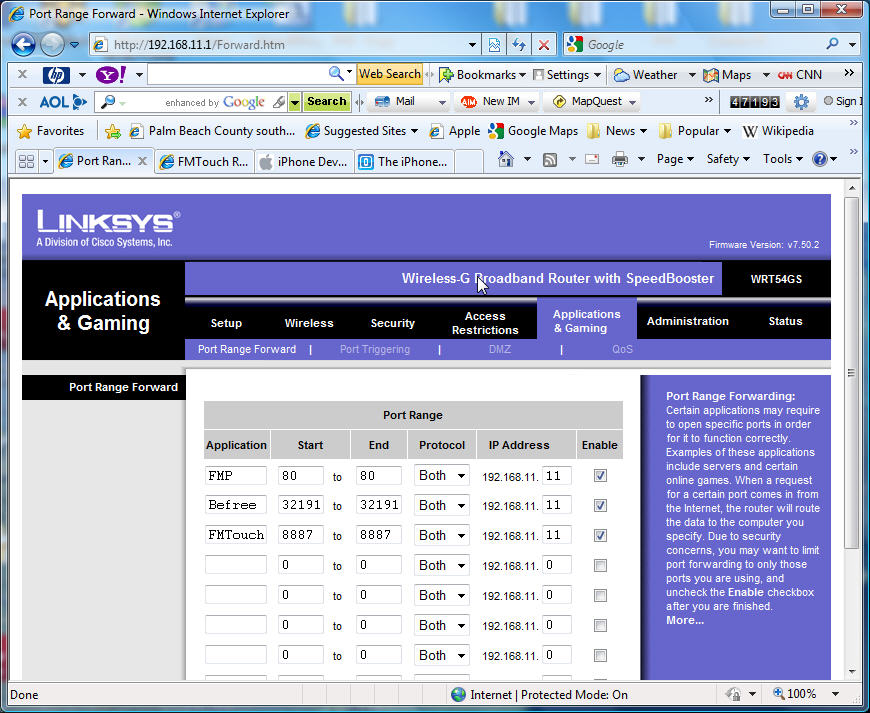
Fig. 1 If you are using a Linksys router, open your Linksys setup program, by typing the ip address of your router into your browser's address bar. Usually it's 192.168.1.1 and unless you changed the security settings, the user name is blank and the password is "admin". Once you open the setup program, click on the Applications and Gaming tab and add FMTouch as indicated below. USE YOUR ROUTER'S IP ADDRESS NOT THE ONE SHOWN BELOW. Save the changes and exit the setup program.

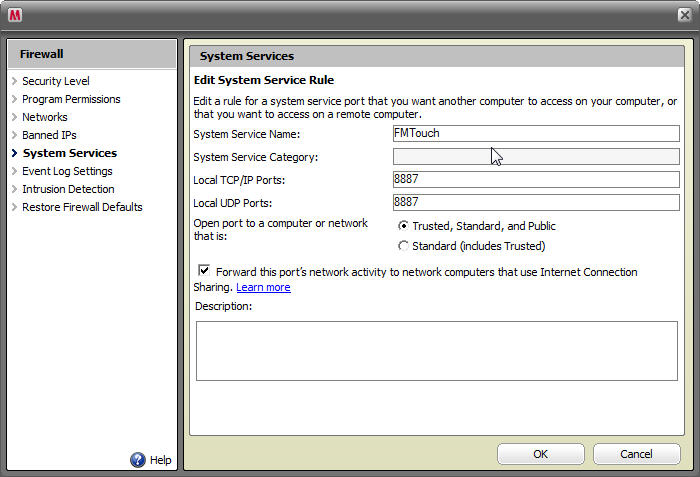
Fig 2 For those of you using McAfee firewall software, open the firewall software and edit the System Services by adding the FMTouch port as indicated below.

Fig 3. For those of you using Windows firewall software, you will need to add a port as indicated below.

Quick guide for manually connecting The Desktop Dispatcher to iDispatcher. Initiate a sync by clicking on the Sync button at the bottom of the Work Order tab in iDispatcher.The Windows
plug-in does not automatically advertise itself on the network. Please use the
"Manual Connection" option to connect to a The Desktop Dispatcher.
Step 1. Select the “Manual” button to connect.
The “Manual Connection” window will open. Type in your computers ip address.
To find you ip address, follow these instructions.
On your pc, hold down the windows key and press the letter “R”.
This will open the “Run” menu. Type the word “cmd” or “command”.
A Dos window will open. Type the word “ipconfig” without the quotes into the window. Your IP address will be listed in the window.
Enter the IP address into iDispatcher, and then press the “Connect” button.
A window will appear on your Windows computer. Select either Allow Always or Allow Once.
You will be prompted to enter a security key. Remember this four digit key and press the
"OK" button.
Some Quick Notes on Syncing and New advanced syncing options.
Syncing Information - There are four main things to remember related to syncing The Desktop Dispatcher
with iDispatcher. First when you sync iDispatcher sends any delete commands to The Desktop Dispatcher, so if
you deleted any records on iDispatcher that existed in the FileMaker database when you initially
synced, those records will be deleted from The Desktop Dispatcher when you sync. So iDispatcher sends all
delete commands first.
Next iDispatcher sends all of the edits that were made on the go. When there is a conflict of edits,
meaning - if you edited the record during the day in The Desktop Dispatcher and then synced an edited
record from iDispatcher, iDispatcher takes priority. This means that any edits in iDispatcher are
synced back. However if you have not touched the record and have not modified any
information any changes made during the day in The Desktop Dispatcher to records that were not modified
in iDispatcher were not affected.
Once iDispatcher updates all the records, it also inserts and adds any new records to your database.
These records are just added in. If records were added in throughout the day, to the very same
database all new records that were added on the main database and inside of iDispatcher are
synchronized together and are mixed into one big list.
Once iDispatcher has finished this, it looks at all of the updated calculations in The Desktop Dispatcher– at
all of the new records added during the day and pulls all of that data back, and you have a fresh
synchronized copy of the database on iDispatcher. So the process goes in this order – iDispatcher
first sends the deletes – sends the updates – inserts any records and then synchronizes it all
together.
Advanced Sync Options
You can find this section after making a connection to your Desktop Dispatcher and before you
start the sync. Simply select the “Advanced” button. You will see a number of selectors, by
default they will all be set to “On”.
Send New Records – turning this off will prevent any new records created inside of iDispatcher
from being sent during the sync. Please note, that after the sync, any new records will be deleted
from iDispatcher
Send Updates – allows you to prevent any edits from being sent during the sync. Once the sync
is complete all data will revert to the current state of The Desktop Dispatcher
Send Deletes – If this is turned off, any deleted records on iDispatcher will reappear after the sync
when they are downloaded from The Desktop Dispatcher.
Get Latest Data – This option will clear all of the database changes, clear all of the new records,
updates, deletes and will re-download the data from The Desktop Dispatcher.
In most cases you will want to keep “Get Latest Data” on, and you may want to turn the other
three options off. If you do turn these off, any changes made on the iPhone will never be sent to
The Desktop Dispatcher. Your selections will be carried over between syncs.
Additionally, the first time you sync, you will be prompted to select a folder to store photos and signatures from the iPhone. We suggest using the "photos" folder located in the directory where The Desktop Dispatcher in installed. c:/user/program files/Custom Desktop Solutions/The Desktop Dispatcher/photos